Sunday, May 25, 2014

I just updated!

Yay! I started five of those posts a couple months ago and then life got busy.  I saw them and realized they wouldn't take long to finish.  So I did and then added some more.  They are all out of order but you can see some of the things I have been up to this year.  I have a lot more to do, but at least it is a start! Enjoy!

Little Miss' doll

So I made my niece a doll for Christmas.  It wasn't too hard but not super easy either.  I looked at lost of tutorials I found on Pintrest and came up with my own.  
First, I drew the shape I wanted the doll to be.  

Next, I cut out the fabric (both pieces at the same time). 
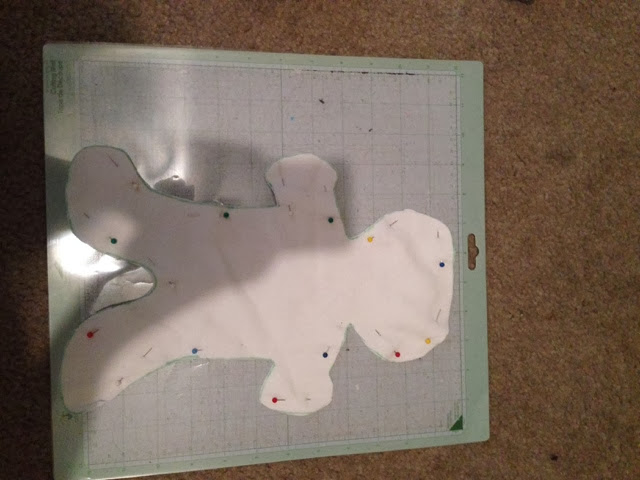


I sewed around the edge leaving a whole at the top of the head.  I then turned it right side out. 


You can see the hole I left in the next picture.  


Next, I stuffed the doll and sewed up the top.  I don't always do a pretty job.  I wasn't worried about this because I knew I would be putting hair on the doll.  


This is the doll before I added anything.  It's not too bad. 


Next, I cut out hair out of fleece.  It's softer than felt (which is what most people use) and solid so she couldn't tangle her little fingers in yarn.  It is two pieces that I sewed together.  I put a couple stitches in to keep it on her head.  


Next, I sewed on blue buttons for eyes. 


I attempted to make a dress.  I liked it until this point.  She doesn't care, but next time I hope to make better clothes.  


I also used a scrap to make a little blanket for the doll.  


And.....She loved it!


Tooth fairy

We read this really great book.  The cover is the picture below.  The tooth fairy is a hot topic in First Grade.  This book helps explain why the tooth fairy looks different to each person.  The students loved it! 


Below is another class' response to what they think the real tooth fairy looks like.  In the book, it talks about how children don't see the real tooth fairy because it would scare them.  To help with this, the tooth fairy takes on the image of someone the child trusts.  My students art didn't get hung up for this.  There written response went home with their pictures.  I had my students do a painting of what their tooth fairy looks like when they appear.  It didn't go as well as having the student think of what the real tooth fairy looks like.  I hope that makes sense.  


Is it a worm or a caterpillar?

Guess what we found on the playground? Well we didn't know for sure at first either.  The students all had an opinion and so we did some research. This was a group activity.  Below is the Venn Diagram we did to decide if it was a caterpillar or a worm.  


After we did that, we did some research to find out.  We discovered it is actually an inch worm which is a type of caterpillar. The students each wrote about what they learned and we made the display below.  


Disney fun!!!

So the following are just some fun pictures from earlier this winter/spring (it never got very warm). They were all taken at EPCOT.  Enjoy!


How Many People Can your boat hold?

So there is this really fun and exciting experiment where students build aluminum foil boats.  Before they do, we talk about what a boat is and what shapes might be. After they have all built one, with no tape or glue, we put it in a tub of water and see how many people it can hold before it sinks.  The students love this activity.  I didn't get any pictures of the boats with the students this year.  If I think about it, I can post some from last year later.  The activity takes a long time but it is worth it in many ways.  We have to count each of the people which can be a struggle for some of the students (this year we did it at the beginning).  


After the students finished, we wrote in our science journals.  The students were able to record what they did and what they learned.  


We also had this chart with their estimate and the actual number their boat held.  When we finished, we discussed the best way to fold the boat so that it can hold the most people. 

My favorite valentines boxes

So for Valentine's Day, my students get to bring in a box to put their Valentine's in when we pass them around. These are a couple of my favorites from this year. 

Yes, this is from Star Wars. 


The next three are different angles of tank.  


October Science Projects

First graders have very curious minds.  This year I have been trying to let them have more exploration.  The science journals have helped.  They also allow an outlet for the students to record their explorations.  I hope to use them more effectively as time goes on.  This October, my class was showing great interest in researching different things.  Before I explain their projects and how we did  them, let me note that this was a lot of work for me as the teacher.  I have learned things and ways to make it easier in the future.  Even though it was difficullt, it was worth it.  I started out by limiting what they could study otherwise it would have been too much  for me.  Since Halloween was close, bats and owls were popular.  Some however, did not want to study this so I gave them the option of birds.  I began by having them write down what they wanted to study on an index card.  I also had them write down what kind of project they wanted to do.  Below are some of the cards.  I took the information and paired the students up according to topic and project.  Some of the projects changed over time, but this gave a starting point.


I know I am slow at updating. I started about six posts but never finished them. I'm going to try to do that now. 

Below are some of the projects they came up with, mostly on their own.  


On the picture below, I wanted to point out the two bats on the left.  The boys had no trouble writing their books, but the real learning came when they tried to make a model of the bats.  This is about their fifth attempt to get it close to proportional.  They learned a lot about the body of the bat. 


We learned that some bats eat about 2000 insects a night.  Two of my girls were like, "how many is 2000?" They wanted to see how many it was so they could understand. We came up with the idea to put one bead for each insect.  The girls counted groups of 10 and then put 10 groups of 10 into a little cup to make 100.  This helped them keep track of how many they had. It was a really big help since this took them several days to complete.


There were three students who wanted to study owls.  The picture below was made by one of the students.  The torn paper represents the owl's feathers.  Below that is a book that the whole group made.  Each student made one page in the book.  


Two of my boys were interested in where bats lived.  At first, they wanted to mark where EVERY bat lived.  We decided that was WAY too much.  Using a map and trying to make a simple legend was difficult for them.  It was their first experience trying to do anything like this.  


The picture below is the beginning stages of two of the models above.  They are the beginnings of a bird and a bat.  In this group, the two compared/contrasted the two.  The clay they used was better than I expected.  Also, it was not too expensive.  Two more students made models but I can't find the pictures of this stage.  They are, however, the two birds in the first project picture. Those that choose a model also had to write a little book about what they learned.  


Sorry some of the pictures aren't too great but you can get the idea.  I have tons more but they have my students' faces in them and I can't post those online.